Events are created and housed in a separate, top-level Events site in Cascade. Create an event.
Individual offices, departments, and areas have a folder within the Events site; but all events created are part of a single, central calendar. Using the various categories and filters available, events can be marked for inclusion in filtered calendar pages and blocks and to refine search results on the main events page. The filters provide additional details to users as well.
Tips for Cross-Posting Events in Crimson Connect
Are you with an academic department or office and also posting your event in Crimson Connect?
Follow these additional instructions when posting the Crimson Connect event to avoid duplicate events in the Central Calendar.
 An event can be created by one department and housed in a single folder but can be added to more than one area using filters—causing the event to appear on multiple sites. An event can be a single occurrence or a recurring event. Recurring events are housed in a separate folder within each site's folder.
Is your event postponed or canceled? Here’s what to do.
To Create an Event
-
In Cascade, navigate to the Events site.
-
Go to the Dashboard, click the SITE menu in the top left, and select Events.
-
-
Navigate to your area’s folder, then to the appropriate year and month. Click on the View Folder arrow to the right of the target folder. >
-
Note: If the event repeats on a schedule, you will need to select the recurring folder instead of the year and month folder.
-
-
Click the pink +Add Content button at the top and choose Event (or Recurring Event, if it repeats on a schedule).
Please review the options for events (below) to create your event.
Event Sections and Options
- Placement Folder
- Where your event is located, which should be the year and month of the event. Events should be housed in the appropriate year/month folder (unless it is a recurring event—place those in your area’s recurring folder).
- Title
- The title/headline to appear on your event.
- Description
- This is a summary of the event. It will appear in calendar search results and in event previews. However, the summary will not appear when the event page itself is being viewed. You must also complete the Content field (below).
- Event - Redesign > Content
- This is the actual text that will appear on the page. This can include text used in the summary and any additional information about the event.
- Avoid using the date, time, and location here, as those will be displayed elsewhere on the page.
Event Section
- Is this an all-day event?
- Select Yes for events that don’t have a set start and end time, and instead are all day. Once selected, the Start Date/End Date options will change to drop the time options.
- Should this event repeat? (This option is only available on recurring events.)
-
If your event repeats, choose Yes. Once selected, you will see the recurring event options.
- Repeat every: the interval days/weeks/months/years
- Frequency: choose from days, weeks, months, or years; related to “repeat every”
- End on: the date of the last recurrence
Example:
Event that recurs once a week for a month.
- repeat every: 7
- frequency: days
- ends on: one month from now
- Start Date/End Date
- Click the small calendar icon to the right of the input area. Use the calendar to choose the date, and the up/down arrows to choose the hour, minute, and a.m./p.m. Simply click out of the window to confirm your choices.
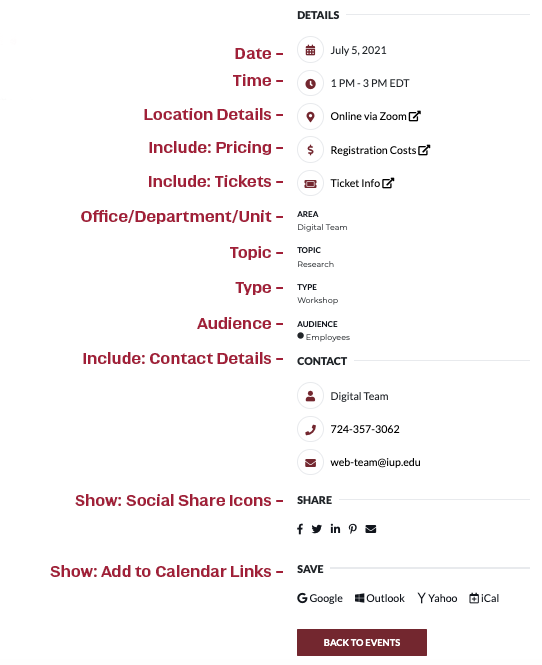
Filters
Filters are applied to the event and you can use them to create custom event listings on the site. Site users can also search the events site, and use the filters (except for Office/Department/Unit) to refine their search to find events that match their interest.
- Is this a featured event?
- For use by the Digital Team. (Leave this set to No.)
- Office/Department/Unit
-
Multi-select. Mark or tag an event for an individual area, and/or multiple other areas. This field uses predictive text, so as you type the list will automatically show matches. Alternatively, the list is scrollable. Click to select an area to choose.
To remove a selection, click in the box after the selection and hit delete/backspace.
If you are looking for a filter that is not listed, contact web-team@iup.edu. Note that Office/Department/Unit is not an available search option or filter for users on the published calendar site.
All events should have at least one selection for this filter.
- Topic
- Multi-select. A way to categorize events happening across campus by their common topics, whether they are related to research, admissions, diversity, homecoming, commencement, equity and inclusion, or a combination of the available topics.
- Academic Calendar
- Only for use by the Registrar. Leave this set at None.
- Location
- Single-select. The general location of your event, whether in Indiana, Northpointe, Pittsburgh East, Punxsutawney, or online/virtually.
- Type
- Multi-select. Get specific with the type of event, whether it is a concert, workshop, exhibit, a Crimson Common Hour event, or one of the various other types available.
- Audience
- Multi-select. Choose one or more audiences; or, if none apply, choose None.
Location Details
Specific location information for your event.
- Event Location and Link
- Include the physical location and room number if applicable. For online events, you can add a Zoom or other link in the Link field. Note, this is not a registration field.
Content
The main body content of your event. This is a rich-text area and can support images, links, rich text, and more.
Include
This section provides multiple ways to include additional information for your event. Checking the box to the left of each section will add the item to your event. Be sure to fill in all required fields. If you don’t want to include a specific section, simply uncheck the associated box.
- Tickets, Pricing, Other Details
- There are multiple options in this section, allowing you to add ticket and/or registration information. (Please disregard the Map Marker; the Location section includes map/location information.)
- Contact Details
- Provide a name, phone, and/or email address for requesting more information. You can use one or all three fields. Simply leave the ones you don’t need blank.
- Banner Image
- While you can add images to the Content area, this provides a way to add a “hero”-style image to your event. There is also a Thumbnail option here as well; that will appear with your event on the Central Calendar listing and other site calendars where your event may be displayed. Please note, while two image sizes are listed in the CMS, you can use the same image file for both the Banner and Thumbnail. You don't have to create and upload two images, but you have the option. A width of 750px wide and min height of 415px is suggested. More info on uploading images can be found in the image how-to section.
Show
These options will be selected by default.
- Related Events
- Displays a selection of events that match your event’s filter options at the bottom of the page. You can choose “and” to show events that match exactly, or “or” to show events that match at least one filter.
- Add to Calendar Links
- Adds icons and links to add your event to a user’s Google, Outlook, Yahoo, or other calendars.
- Social Share Icons
- Adds social sharing icons for users to easily share the event on Facebook, Twitter, LinkedIn, Pinterest, or email.
Cross-Posting Events in Crimson Connect
Why duplicates happen: Crimson Connect events are included automatically in the Central Calendar (iup.edu/events). Sometimes it is necessary for an academic department or office to post an event in both systems. However, that creates duplicate events listed in the Central Calendar, which can cause confusion for site visitors.
To Avoid Duplicates on the Central Calendar
In Crimson Connect:
- When creating an event, locate the Event Visibility section.
- Select Show to Students and Staff at Crimson Connect.
- This is recommended for academic departments and offices; student organizations do not need to do this.
This option prevents the event from being included in the Central Calendar on iup.edu, while still displaying it on Crimson Connect.
Keep Content Consistent
Make sure that the content in both postings is identical and consistent. Use the same image, title, description, date/time, contact info, etc.
There are differences between how events are created and displayed in each system, but by keeping the information consistent you will help reduce any possible confusion.
If your event has a change (date, time, contact, etc.) be sure to update both events as well.